
General settings
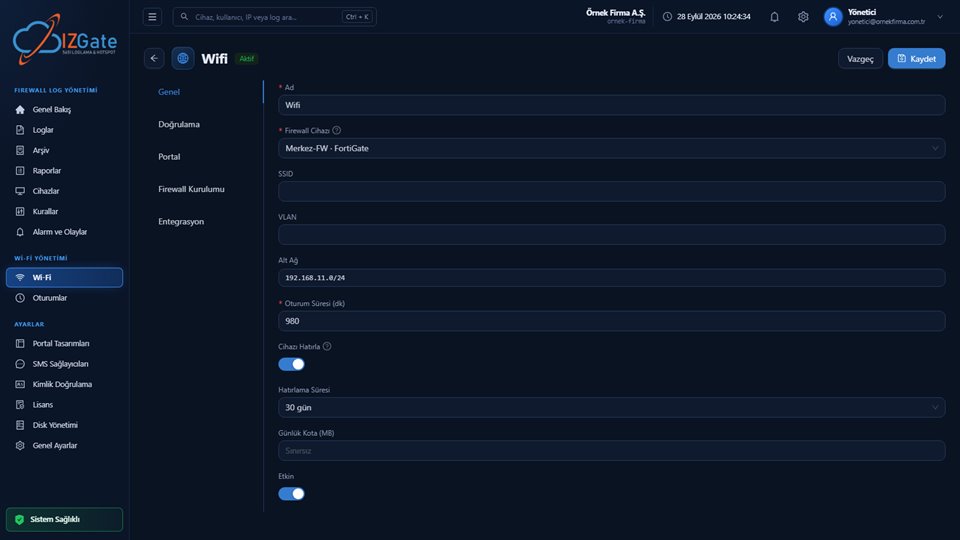
Network name, connected firewall device, SSID, VLAN, subnet, session duration (minutes), the "remember device" toggle and its duration, a daily quota (MB), and whether the network is active — all in one tab.
In the Wi-Fi > Networks tab, each guest network's name, connected firewall, selected verification methods, portal address, and session duration are visible on a single line. Open a network and you can edit everything through the General, Verification, Portal, Firewall Setup, and Integration tabs.

Networks, Guests, Pending Approvals, Pre-Registrations, Registered Devices, Visitor Codes — all tabs within the same Wi-Fi page.
Name, SSID, Firewall (device name + driver), Methods (multiple tags), Portal Address (copyable), and Duration columns.
A button in the top right for adding a new network; an edit (key/settings) icon sits at the end of each row.
Network name, connected firewall device, SSID, VLAN, subnet, session duration (minutes), the "remember device" toggle and its duration, a daily quota (MB), and whether the network is active — all in one tab.
Combine as many as you like from SMS, Turkish ID Number, Voucher, Admin Approval, Account, Organization Verification, Pre-Registration, Firewall Users, and Device registration (MAC); you also manage the network password and the KVKK consent requirement here.
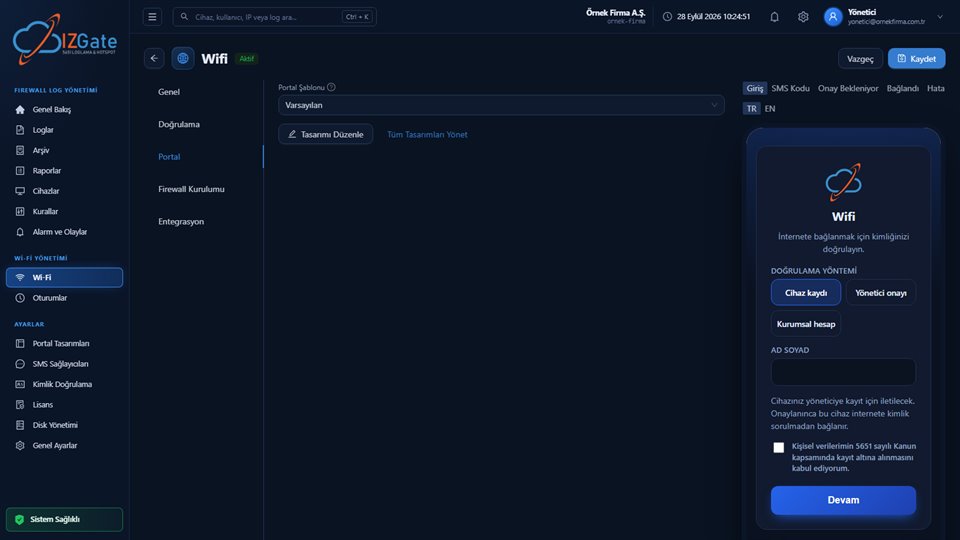
Attach a portal template (from Settings > Portal Designs) to the network; "Edit Design" jumps straight to the template, and "Manage All Designs" returns to the list.
See a setup guide generated automatically for your device: for FortiGate, steps for the REST API administrator, profile, and trusted hosts; the portal address and warnings are listed at the top.
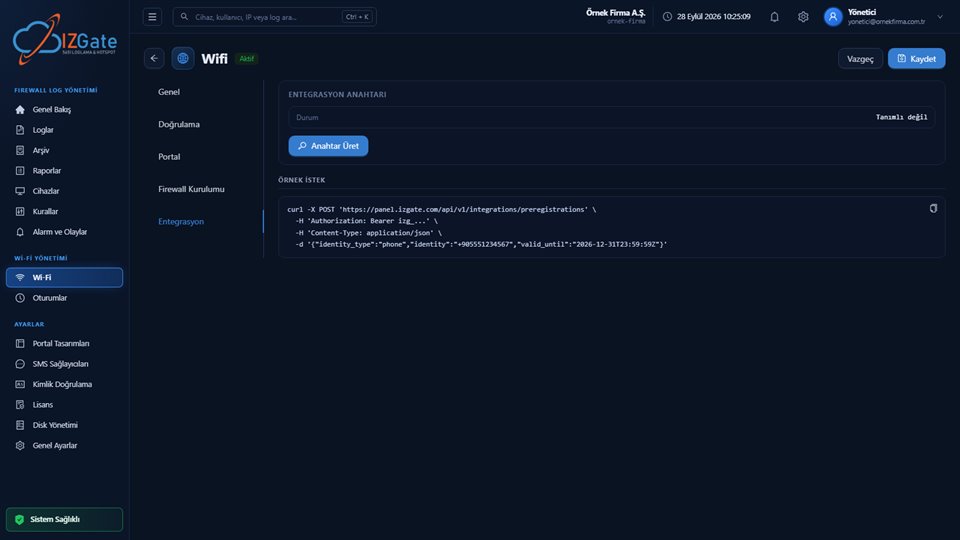
If you'll use the pre-registration API, generate an izg_… key here and copy the sample curl request.
Add extra private addresses (RFC1918/CGNAT or a defined list) the firewall can hand over to, from the Verification tab; handover never goes to public internet addresses.
The screen shows, in order: Name, Firewall Device (dropdown), SSID, VLAN, Subnet, Session Duration (min), a "Remember Device" toggle with the Remember Duration field that appears once it's on, Daily Quota (MB, unlimited if blank), and the network's Active toggle at the bottom. Discard/Save buttons sit at the top right, with the network name and an "Active" badge in the header.
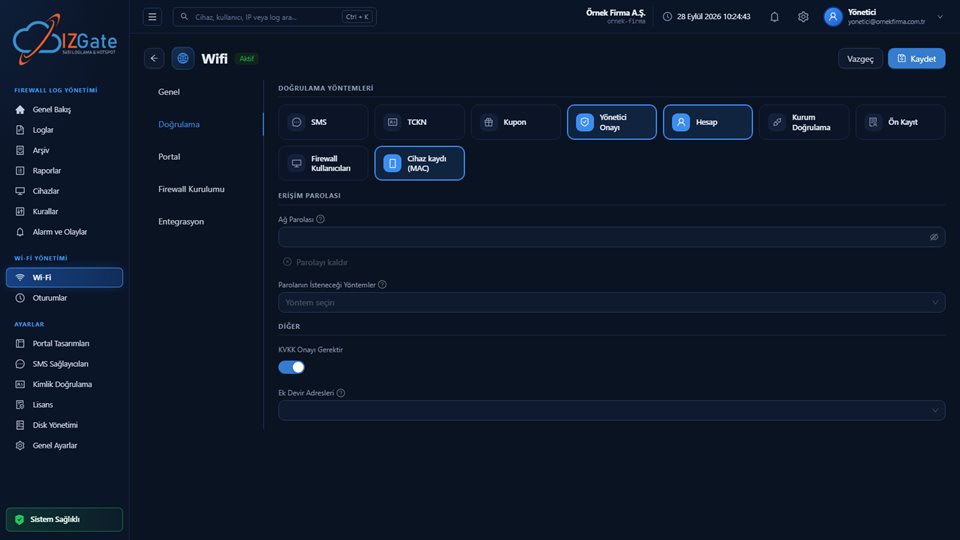
The screen lists the methods as eight square tiles: SMS, Turkish ID Number, Voucher, Admin Approval, Account, Organization Verification, Pre-Registration, Firewall Users; a Device registration (MAC) tile sits on a row below. Selected methods are highlighted with a blue outline (in the example, Admin Approval, Account, and Device registration are selected).
Below that is the Access Password section: a Network Password field (with an eye icon to show/hide and a "Remove password" link) and a dropdown choosing which methods also require it. The other section has a "Require KVKK Consent" toggle and Additional Handover Addresses (a multi-select dropdown).
On the left is the Portal Template dropdown (in the example, "Default" is selected), with "Edit Design" and "Manage All Designs" links underneath. On the right is a live preview panel rendered with the actual template: step tabs at the top (Login, SMS Code, Awaiting Approval, Connected, Error), TR/EN language tabs, and below that the portal card itself — logo, title, verification method buttons, form fields, a KVKK consent checkbox, and a "Continue" button.
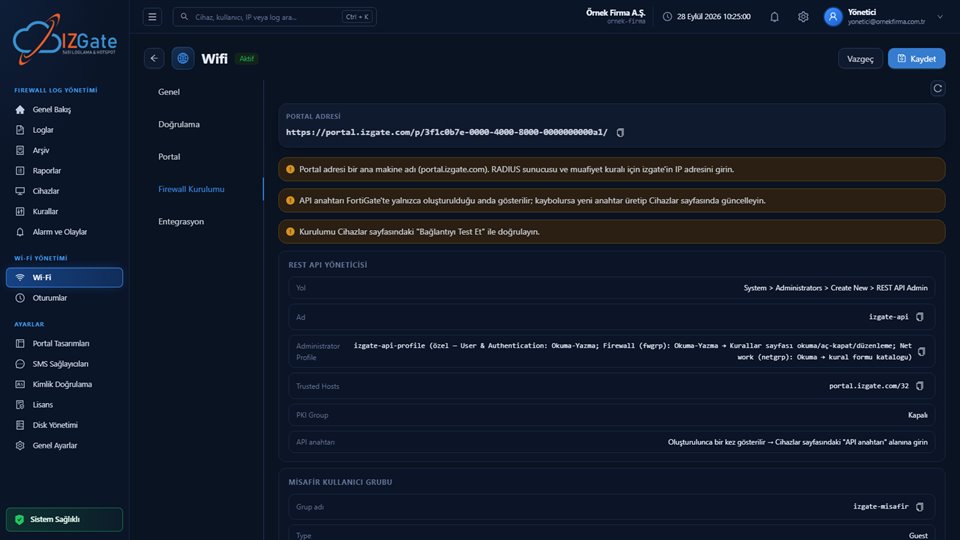
At the top is a copyable Portal Address, followed by three warning boxes: a reminder that the portal address is a hostname and an IP must be entered for a RADIUS/exemption rule, that the API key on FortiGate is shown only at the moment it's created, and that the setup should be verified with "Test Connection" on the Devices page.
Below that is the REST API Administrator section: the path to follow (System > Administrators > Create New > REST API Admin), a suggested name (izgate-api), a permission summary for the Administrator Profile (read-write for User & Authentication, read-write for Firewall/fwgrp, read for Network/netgrp), Trusted Hosts (portal.izgate.com/32), a PKI Group, and a note that the API key is shown only once. Next comes the Guest User Group section (group name izgate-guest, Type: Guest). Each field has a copy icon next to it.
If your organization's own system (PMS, patient registration, student information system) wants to register a guest with izgate before they arrive on the network, generate an integration key from this tab. At the top is the key's status ("Not defined" or its masked form once generated) and a "Generate Key" button. Below is a ready-made sample request box: curl -X POST 'https://panel.izgate.com/api/v1/integrations/preregistrations' with an Authorization: Bearer izg_… header and a JSON body containing identity_type, identity, and valid_until fields; a copy icon sits at the top right of the box.
The key is valid for calls to this endpoint alone, without a panel session; it differs per network, and each network has its own key.
In Wi-Fi > Networks, use "New Network" to name it and choose the connected firewall device and session duration.
In the Verification tab, select the method(s) that fit the network, and turn on the network password and KVKK consent if needed.
Pick a ready-made design in the Portal tab, or create and attach a design that uses your own HTML.
Follow the steps in the Firewall Setup tab and test the connection from the Devices page.
The guide in the Firewall Setup tab is generated according to your device's driver; FortiGate and MikroTik have a ready-made CLI/step list, while other drivers show general steps. The portal address is a hostname (portal.izgate.com); for configurations that require an IP, such as a RADIUS server or an exemption rule, you'll need to enter izgate's actual IP address separately. The API key is shown only at the moment it's created on FortiGate — if you lose it, generate a new key and update it on the Devices page.
You can select as many as you like, together, on the same network, from the nine methods (SMS, Turkish ID Number, Voucher, Admin Approval, Account, Organization Verification, Pre-Registration, Firewall Users, Device registration); the guest picks whichever suits them on the portal.
Yes, you apply the copyable steps generated for your device (such as the REST API administrator, profile, trusted host, and guest group on FortiGate) on the firewall side yourself; then verify with "Test Connection" on the Devices page.
The portal address is generated as a hostname like portal.izgate.com. For firewall settings that require an IP, such as a RADIUS server definition or a captive-bypass/exemption rule, you're asked to enter izgate's actual IP address separately; the guide flags this as a warning.
You use the izg_… key you generate in the Integration tab in the Authorization: Bearer header of requests your organization's system sends to the pre-registration API (/api/v1/integrations/preregistrations); no panel session is required.
Yes. The access password is defined as an extra layer on top of your chosen verification method; in the Verification tab you can choose which methods also ask for it.
Configure izgate Cloud based on your number of firewall devices and storage needs; no setup, get started in minutes. Call us with any questions.